
Table of Contents
- What Is High Guitar Action and Why It Matters
- How to Measure Guitar Action Accurately
- Essential Guitar Setup Tools You’ll Need
- Guitar Truss Rod Adjustment: Fixing Neck Relief
- How to Adjust Guitar Bridge Height
- Step-by-Step: How to Fix High Guitar Action
- Common Mistakes to Avoid When Lowering Action
- Environmental Factors: Humidity and Temperature Impact
Last Updated: July 12, 2026
What Is High Guitar Action and Why It Matters
High guitar action creates a gap between the strings and the fretboard that makes playing physically demanding. Action refers to the height of the strings above the fretboard, measured at specific points. This measurement directly affects playability, tone quality, and your overall enjoyment of the instrument. While high action isn’t always a defect, fingerstyle players sometimes prefer it intentionally, when it prevents comfortable playing, a setup is necessary.
The relationship between action height and playability is straightforward: lower action makes fretting easier but increases fret buzz risk, while higher action demands more finger strength but provides cleaner notes. Finding the sweet spot requires understanding your playing style, hand strength, and the guitar’s structural condition.
Signs Your Guitar Needs a Setup
Your guitar signals when action has become problematic. Finger pain or fatigue during practice sessions is the most obvious sign. Difficulty bending strings or avoiding certain chord shapes because they’re physically taxing also indicates high action requiring attention.
Watch for inconsistent playability across the neck. Some sections might feel comfortable while others feel tight, signaling uneven neck relief or bridge height issues.
Ignoring high action typically worsens over time as wood shifts with humidity changes and string tension. The longer you wait, the more extensive and costly the correction becomes.
How Action Affects Playability and Tone
High action creates physical barriers to good technique. Your fingers must travel farther to contact strings, slowing your playing speed and increasing required force. This affects everything from barre chords to lead playing.
Higher action allows strings to vibrate more freely, potentially producing richer tones. However, when action is too high for your ability, you’ll press harder than necessary, creating tension that dampens vibration and worsens tone. Intonation also suffers, excessive pressure pushes strings sharp during bends and aggressive fretting.
How to Measure Guitar Action Accurately
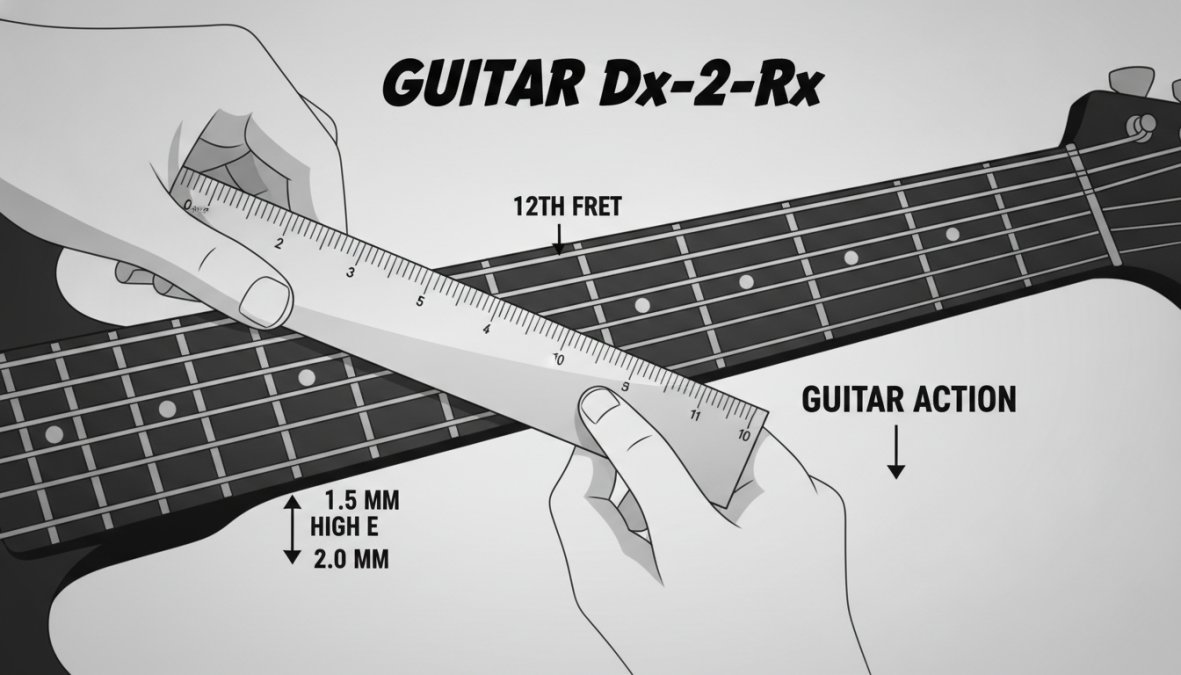
Measuring action requires precision and the right reference points. Accurate measurement determines whether your setup is actually the problem and guides your adjustment decisions.
Understanding Ideal Action Heights
Standard action heights vary by guitar type. For acoustic guitars, typical action at the 12th fret runs 2.0-2.2mm on the bass side and 1.8-2.0mm on the treble side. Electric guitars generally sit lower: 1.6-2.0mm on the bass side and 1.4-1.8mm on the treble side.
The bass side is typically slightly higher than the treble side because lower strings need more clearance to vibrate without buzzing. However, ideal action depends on your specific situation. Aggressive players might prefer slightly higher action to prevent buzz, while fingerstyle players often prefer lower action for comfort.
Measure at the 12th fret specifically, this midpoint gives you the clearest picture of overall neck relief and bridge height.
Essential Guitar Setup Tools You’ll Need
Professional setups require specific tools, though you don’t necessarily need expensive equipment.
Diagnostic and Measurement Tools
A precision straightedge (24-28 inches long) lets you sight down the fretboard to identify neck relief issues. A feeler gauge set allows accurate measurement of action heights and neck relief, with gauges ranging from 0.010 to 0.030 inches. A notched straightedge checks fret height variation, revealing which frets are high or low. A depth gauge measures bridge saddle height before and after shaping.
Adjustment Tools for Bridge and Saddle Work
A set of files, specifically a diamond-grit fret crowning file and saddle-shaping file, allows you to modify bridge saddle height and contour. Sandpaper in progressive grits (120, 180, 220, 320, 400) prepares saddle surfaces for final shaping. A truss rod wrench must match your guitar’s specific design to avoid stripping the adjustment nut. A capo helps isolate neck relief issues during diagnosis.
Guitar Truss Rod Adjustment: Fixing Neck Relief
The truss rod is your primary tool for addressing neck-related action problems. Understanding how it works and when to adjust it is crucial for successful setup work.
Identifying Neck Bow Issues
Neck relief refers to a slight forward bow in the neck, which is intentional and necessary. This curve allows strings to vibrate without buzzing, especially on lower frets. Too much relief creates excessive action, while insufficient relief causes fret buzz.
To diagnose neck relief, place a straightedge on the fretboard and sight down the neck toward a light source. You’re looking for a tiny gap under the straightedge at the middle frets, typically 0.010 to 0.015 inches. If the straightedge touches all frets simultaneously with no gap, your neck has zero relief or back-bow, causing fret buzz. If the gap exceeds 0.020 inches, your neck has too much relief, creating high action.
Environmental factors influence neck relief constantly. Humidity changes cause wood to expand and contract, affecting the neck’s curvature. A guitar that played perfectly in winter might develop back-bow in summer.
Step-by-Step Truss Rod Adjustment Process
Most modern guitars use a single-action truss rod accessed from the headstock. Tightening the rod pulls the neck into back-bow (reducing relief), while loosening it allows the neck to bow forward (increasing relief).
Locate the truss rod access point, usually covered by a small plastic cover on the headstock. Insert your truss rod wrench and make small adjustments, typically one-quarter turn increments. After each adjustment, let the neck settle for a few minutes, then re-check relief with your straightedge.
To increase relief, turn counterclockwise. To decrease relief, turn clockwise. Make adjustments slowly and check frequently to prevent over-adjustment.
Never force the truss rod. If you feel resistance, stop immediately. Forcing it can strip the adjustment nut or crack the truss rod itself, requiring expensive professional repair.
After achieving proper relief, let the guitar sit for 24 hours before final action measurements. The wood needs time to settle after truss rod adjustment.
How to Adjust Guitar Bridge Height
Bridge adjustment is the second critical component of fixing high action. The bridge saddle, the small piece of bone or synthetic material sitting on top of the bridge, is what actually contacts the strings.
Bridge Saddle Shaping and Lowering
The saddle must be shaped to match your fretboard radius while sitting at the correct height. The saddle’s top surface should follow the same curve as your fretboard, typically a 9.5-inch to 16-inch radius on electric guitars and 12-inch to 15-inch on acoustics.
Measure your current saddle height by placing a straightedge across the bridge and measuring the gap between the straightedge and the top of the saddle. To lower the saddle, remove it from the bridge and shape it by sanding the bottom to reduce height.
Use progressive sandpaper grits, starting with 120-grit to remove material quickly, then progressing through 180, 220, and 320-grit for a smooth finish. Sand in long, even strokes to maintain consistent height. Frequent measurements prevent over-sanding, which forces you to install a new saddle.
Nut Slot Adjustment for Lower Action
The nut, the piece at the headstock end of the fretboard, also affects action height, particularly on the first few frets. If your nut slots are cut too high, open strings sit too far above the fretboard, creating high action at the first fret.
Proper nut slot depth positions strings so they sit slightly above the first fret when open, typically 0.005 to 0.010 inches. Nut slot adjustment requires specialized tools and skill. Many players prefer having a luthier handle nut work rather than attempting it themselves.
Step-by-Step: How to Fix High Guitar Action
This comprehensive process walks you through the complete setup sequence, addressing each component systematically.
Phase 1: Diagnosis and Measurement
Start by measuring your current action at the 12th fret on both the bass and treble sides. Check neck relief using your straightedge and feeler gauges. Identify whether your neck has proper relief, too much relief, or back-bow.
Examine the bridge saddle for wear or damage. Check whether the bridge itself is straight and properly seated. Look at the nut slots, are they visibly deep or shallow compared to the bridge saddle height?
Take photos of your guitar before starting any adjustments. These become reference points if something goes wrong.
Phase 2: Addressing Neck Relief and Truss Rod
If your neck relief measurements indicate problems, adjust the truss rod before touching the bridge. Make small truss rod adjustments, one-quarter turn at a time, and wait 5-10 minutes between adjustments. Once your neck has proper relief, you’re ready for bridge work.
Phase 3: Bridge and Saddle Adjustment
With neck relief confirmed, measure your saddle height again. Calculate how much material you need to remove to reach your target action height. Remove the saddle and sand the bottom surface carefully with progressive sandpaper grits.
After shaping, reinstall the saddle and measure action again. Make small adjustments if needed. If you’ve removed too much material, you’ll need a new saddle.
Phase 4: Intonation Check and Fine-Tuning
Once action feels comfortable, check intonation. Tune each open string to pitch, then measure the fretted note at the 12th fret using a tuner. The fretted note should match the open string pitch.
If fretted notes are sharp, your bridge saddle might still be too high. If fretted notes are flat, your saddle might be too low. Small saddle adjustments affect intonation, so this is your final refinement step.
Play the guitar for several hours before considering the setup complete. Recheck action and intonation after this break-in period.
Common Mistakes to Avoid When Lowering Action
The biggest mistake is adjusting the truss rod without understanding neck relief. Always diagnose neck relief before touching the truss rod.
Another common error is removing too much saddle material at once. Saddle work is permanent, and over-sanding forces a replacement. Remove small amounts, measure frequently, and resist rushing.
Players often neglect nut slot height when focusing on bridge saddle work. If your nut slots are too high, lowering the saddle only partially solves the problem. You’ll still have high action at the first fret.
Ignoring humidity effects is another oversight. A guitar set up during winter might develop excessive action in summer as wood expands. Account for seasonal changes when setting final action heights.
Never use excessive force during truss rod adjustment. If the rod feels stuck, stop immediately and consult a professional.
Environmental Factors: Humidity and Temperature Impact
Wood responds dramatically to humidity changes, which directly affect your setup. Dry conditions (below 40% relative humidity) cause wood to contract, often creating back-bow or excessive action. Humid conditions (above 60% relative humidity) cause wood to expand, introducing relief and potentially creating fret buzz.
The ideal humidity range for guitars is 45-55% relative humidity. Maintaining this range through seasons and climate changes prevents constant setup adjustments. Many musicians use room humidifiers or dehumidifiers to stabilize their practice environment.
String age and composition also interact with action. New strings have different tension characteristics than worn strings, affecting how the neck responds. A setup optimized for new strings might feel different after a few weeks of playing as strings settle and lose tension.
According to research on guitar wood properties from luthier associations, seasonal humidity swings of 20-30 percentage points can change action height by 0.5mm or more. Professional luthiers account for these environmental factors when setting up guitars, adjusting target action heights based on the current season.
High action frustrates players of all skill levels, but it’s a solvable problem with the right approach and tools. The key is systematic diagnosis, understanding whether your problem stems from neck relief, bridge height, or nut slots, before making adjustments. Whether you’re tackling this yourself or seeking professional help, understanding how to fix high guitar action gives you the knowledge to make informed decisions about your instrument’s playability and tone.
Frequently Asked Questions
How do I know if my guitar action is too high?
High action becomes noticeable when playing feels uncomfortable or requires excessive finger pressure. Common signs include difficulty fretting notes cleanly, hand fatigue during practice, and buzzing or muted tones. You can measure action using a ruler or straightedge at the 12th fret, typical target heights are 2.0mm on treble side and 2.5mm on bass for electric guitars. If measurements exceed these ranges significantly, your action is likely too high and needs adjustment.
Can I lower my guitar action myself, or do I need professional help?
Simple action adjustments, like saddle shaping or minor bridge height changes, can be done at home with proper tools and careful measurement. However, truss rod adjustments, nut slot work, and complex setups require specialized knowledge to avoid damage. If you're uncomfortable with measurements or lack guitar setup tools, professional service ensures precise intonation and playability. Guitar Dx-2-Rx offers expert setup with a guaranteed 5-7 day turnaround if you prefer professional care.
Does adjusting guitar action affect intonation?
Yes, adjusting action can impact intonation, especially when modifying bridge height or saddle angle. Changes to string tension and bridge position affect how strings vibrate and their tuning stability. After lowering action through bridge or saddle work, always check intonation at multiple frets using a tuner. If intonation shifts noticeably, you may need minor saddle shaping or bridge adjustment to restore proper string alignment and compensation.
What tools do I need to fix high guitar action?
Essential guitar setup tools include a ruler or straightedge for measuring action, a capo for neck relief diagnosis, Allen wrenches for truss rod adjustment, sandpaper or files for saddle shaping, and a tuner for intonation checks. You may also need a bridge pin puller, masking tape for bridge protection, and a feeler gauge for precision measurements. Having quality tools ensures accurate adjustments and prevents fret buzz or dead notes that result from improper setup work.
This article was written using GrandRanker