
Table of Contents
- Understanding Your Guitar’s Truss Rod and Neck Relief
- Signs Your Guitar Needs a Truss Rod Adjustment
- Essential Tools for Truss Rod Adjustment Tools
- How to Measure Guitar Neck Relief Accurately
- How to Measure Guitar Action and Its Relationship to Truss Rod Adjustment
- Step-by-Step Process: How to Adjust Truss Rod Safely
- Safety Precautions and When to Stop
- Common Mistakes to Avoid When Adjusting Your Truss Rod
How to Adjust Truss Rod Safely: A Step-by-Step Guide
Last Updated: July 11, 2026
Learning to adjust a truss rod safely is one of the most valuable skills a guitarist can develop. A guitar’s truss rod controls neck relief, the slight curve in your fretboard that prevents fret buzz and ensures playability. This guide walks you through diagnosis and adjustment with a safety-first approach that protects your instrument.
Understanding Your Guitar’s Truss Rod and Neck Relief
The truss rod is a metal rod running inside your guitar neck, parallel to the fretboard. It counteracts the tension created by steel strings pulling on the headstock. When you turn the adjustment nut at the headstock, you change how much the rod resists string tension, shifting neck relief, the forward curve in your neck.
Neck relief is the slight forward bow your neck should have when viewed from the side. A perfectly straight neck causes fret buzz. When you fret a note, your finger pushes the string down, and a straight neck means the string hits higher frets. A small amount of relief, typically 0.010" to 0.015", allows the string to clear those frets while maintaining low action.
The truss rod doesn’t adjust action directly, it adjusts neck relief. Action, the height of your strings above the fretboard, is determined by neck relief, bridge height, and nut slot depth. If your action is too high because your bridge is tall, the truss rod won’t help.
The truss rod is a one-way corrective tool. It fixes problems caused by string tension pulling the neck into a bow. It does not fix action problems caused by bridge height or nut slots.
Clockwise vs. Counter-Clockwise Rotation
Rotation direction matters. Most modern guitars have the truss rod adjustment nut at the headstock. When facing the headstock, clockwise rotation tightens the rod, reducing forward bow and creating a flatter neck. Counter-clockwise loosens the rod, allowing string tension to pull the neck forward into more relief.
Tighter rod = less relief = flatter neck. Looser rod = more relief = more bow. Before you turn anything, identify where your adjustment nut is and which direction tightens it on your specific guitar. A quick online search for your guitar model will tell you the correct direction.
Turning the truss rod the wrong direction can damage your neck. If you turn clockwise and the nut gets harder to turn, stop immediately. You may have a reverse-threaded rod. Forcing it will snap the rod or strip the threads.
Signs Your Guitar Needs a Truss Rod Adjustment
Not every guitar problem requires a truss rod adjustment. Diagnose what’s actually wrong before you touch anything.
Fret buzz is the metallic rattle when you play open strings or lightly fretted notes. It usually means your neck is too flat or has backbow. A truss rod adjustment to add relief will fix it. However, fret buzz can also come from a worn fret, high fret, low nut slot, or damaged bridge.
High action is when strings sit far from the fretboard. Many players assume the truss rod is the culprit, but high action usually comes from a tall bridge or high nut. If your neck has excessive relief, tightening the rod will lower action slightly by reducing the forward bow, typically 1/16" or less.
Visible neck bow is when you can see the neck curves away from the fretboard when you sight down it. A slight forward bow is normal. A dramatic bow means too much relief. A backward curve (backbow) means too little relief or over-tightening.
Measure before you adjust. Guessing leads to unnecessary turns and potential damage.
Essential Tools for Truss Rod Adjustment
You need the correct hex key or wrench for your adjustment nut. Guitar truss rods typically use 4mm, 5mm, or 6mm hex keys. Using the wrong size risks stripping the nut.
A straightedge, a perfectly straight metal ruler 24" to 30" long, lets you sight down your neck and measure relief. A straightedge is essential.
A feeler gauge set is invaluable for precise measurement. Feeler gauges are thin metal blades of known thickness that let you measure the exact gap between your straightedge and fretboard at the 7th fret.
You’ll also want a capo (to simulate finger pressure), a workspace with good lighting, and patience. A neck rest or pillow supports the guitar safely. Do not use a power drill on a truss rod, hand tools only.
| Tool | Purpose | Critical? |
|---|---|---|
| Correct hex key (4mm, 5mm, or 6mm) | Fits the adjustment nut without stripping | Yes |
| 24-30" straightedge | Measures neck relief accurately | Yes |
| Feeler gauge set | Quantifies relief in thousandths of an inch | Highly recommended |
| Capo | Simulates finger pressure on first fret | Recommended |
| Good lighting | Lets you see what you’re doing | Yes |
| Neck rest or pillow | Supports guitar safely during work | Recommended |
How to Measure Guitar Neck Relief Accurately
Measuring neck relief is the foundation of safe adjustment. Place your guitar on a flat surface or neck rest so the neck is level and stable. Sight down the neck from the headstock toward the body, looking along the edge of the fretboard.
Place your straightedge across the fretboard, resting it on the first fret and the last fret (around the 20th or 22nd fret). Look at the gap between the straightedge and the fretboard at the 7th fret, the middle of the neck.
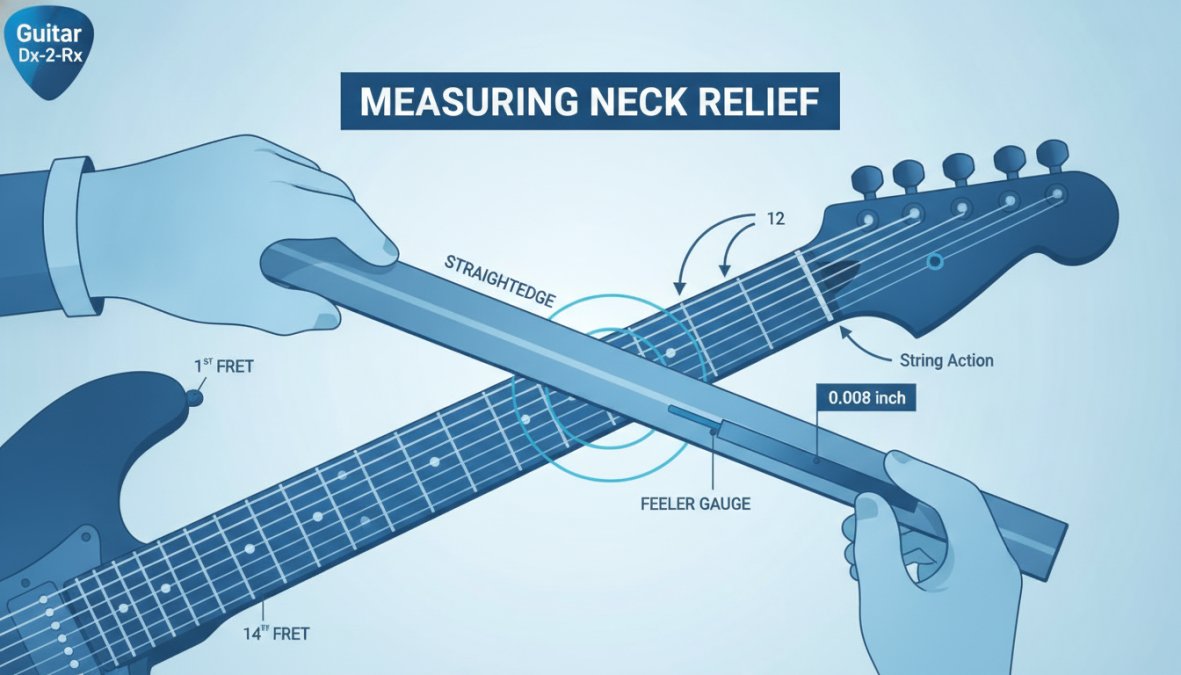
Use a feeler gauge to measure this gap. Slide the blade under the straightedge at the 7th fret until you feel light resistance. The thickness of that blade is your relief measurement. A typical healthy relief is 0.010" to 0.015". Less than 0.010" means the neck is too flat or has backbow. More than 0.020" means excessive relief.
Record this measurement. You’ll use it as your baseline and check it again after adjustment.
The Quarter-Turn Rule Explained
The quarter-turn rule is the single most important safety principle: never turn the adjustment nut more than a quarter turn at a time. A quarter turn is 90 degrees, or the amount you’d turn moving from 12 o’clock to 3 o’clock on a clock face.
A quarter turn creates a subtle, measurable change that you can evaluate before making another adjustment. Most neck relief problems are solved with one to three quarter turns. If you’ve made three quarter turns and the problem persists, stop. The issue is likely something else, bridge height, nut slots, or worn frets.
The quarter-turn rule prevents 90% of truss rod damage. Patience is the real skill here.
How to Measure Guitar Action and Its Relationship to Truss Rod Adjustment
Action is the height of your strings above the fretboard. At the 1st fret, healthy action is 0.030" to 0.050" for electric guitars. At the 12th fret, it’s typically 0.055" to 0.075".
The truss rod affects action indirectly. When you adjust the rod to change neck relief, you’re changing the curve of the neck. A flatter neck (less relief) lowers action slightly. A neck with more relief raises action slightly. However, the effect is modest, typically 1/16" or less. If your action is 1/4" too high, a truss rod adjustment alone won’t fix it.
Measure your action before you touch the truss rod. If it’s high but your neck relief is healthy, leave the rod alone.
Step-by-Step Process: How to Adjust Truss Rod Safely
Step 1: Prepare Your Guitar and Workspace
Set up your workspace in a clean, well-lit area. Remove the guitar’s strings or loosen them significantly to reduce string tension so the neck can move freely. Identify the correct hex key for your adjustment nut and test it to confirm it fits snugly without forcing.
Place the guitar on a neck rest or pillow so the neck is stable and level. Measure your baseline neck relief using the straightedge and feeler gauge method. Write this measurement down.
Step 2: Measure Baseline Neck Relief
With the guitar stable and strings loosened, place the straightedge across the 1st and last frets. Look at the gap at the 7th fret and use your feeler gauge to quantify it. A typical healthy neck has 0.010" to 0.015" of relief. If your measurement shows excessive relief (more than 0.020"), the neck is bowing too much and tightening the rod will reduce this. If your measurement shows too little relief or backbow (less than 0.005"), loosening the rod will add relief.
Step 3: Make Your First Adjustment
Insert the hex key into the adjustment nut and note the current position. For a neck with excessive relief, turn the hex key clockwise a quarter turn. For a neck with too little relief or backbow, turn counter-clockwise a quarter turn.
Turn slowly and deliberately. You should feel gentle resistance, not strain. If the key becomes hard to turn, stop immediately.
Step 4: Allow Settling Time and Re-Measure
After turning the truss rod, the neck needs time to settle. Wait at least 15-30 minutes before re-measuring. After the settling period, measure neck relief again using the straightedge and feeler gauge. Compare to your baseline.
If the relief moved in the right direction but hasn’t reached your target, make another quarter turn. Wait another 15-30 minutes and re-measure. Repeat this cycle until the relief is in the 0.010" to 0.015" range.
Once you’ve achieved the target relief, restring your guitar and let it settle for a day or two. String tension will pull the neck slightly, and the final relief may shift a bit.
Safety Precautions and When to Stop
The most important safety precaution is knowing when to stop. Once you’ve made three quarter turns and the problem persists, stop. You’re not helping anymore; you’re risking damage.
Never turn the hex key with force. A truss rod adjustment should feel smooth and controlled. If you encounter hard resistance, stop. Forcing it will snap the rod or strip the threads.
Watch for signs of over-tightening: a backbow that develops over days, fret buzz that suddenly appears, or a neck that feels rigid. These are warning signs that you’ve tightened too much. Loosen the rod a quarter turn and wait for settlement.
Climate and Humidity Impact on Neck Stability
Wood responds to humidity. As humidity rises, wood expands slightly. As it drops, wood contracts. This expansion and contraction affects neck relief. A neck that’s perfectly adjusted in winter may develop excessive relief in humid summer conditions.
Store your guitar in a climate-controlled environment when possible. A room that stays between 40-50% humidity is ideal for guitar storage.
Common Mistakes to Avoid When Adjusting Your Truss Rod
Over-tightening is the most common mistake. Players see a problem, turn the rod, and if the problem isn’t immediately solved, they turn it again, skipping the settling period. Within hours, they’ve made a half turn or more, flattening the neck and creating backbow.
Turning the wrong direction is the second most common mistake. Always confirm the direction before you turn. If you turn and the nut gets harder to turn, stop and reconsider.
Adjusting when the problem isn’t a truss rod issue is the third mistake. High action caused by a tall bridge won’t be fixed by the truss rod. Fret buzz caused by a worn fret won’t be fixed by the truss rod. Diagnosing the actual problem is more important than making an adjustment.
Not measuring leads to all the others. If you don’t measure your baseline relief and target relief, you’re adjusting blind. Measurement takes five minutes and prevents hours of regret.
Skipping the settling period is born of impatience. The wood needs time to adjust. Wait at least 15-30 minutes between adjustments.
Using the wrong hex key size damages the adjustment nut. Confirm the correct size before you start.
Adjusting with full string tension makes the job harder and less precise. Loosen your strings before adjusting.
If you’ve made multiple quarter turns and your neck is now backbowed or flat, loosen the rod a quarter turn and wait. Do not continue tightening. The problem will resolve with time as the wood settles.
Adjusting your guitar’s truss rod safely is a skill that pays dividends. A well-adjusted neck transforms playability and reduces fret buzz. If you’re uncertain about any step or your guitar has a problem that doesn’t respond to a truss rod adjustment, Guitar Dx-2-Rx offers professional setup services with a guaranteed 5-7 day turnaround.
Guitar Maintenance Guide from Fender
Understanding Truss Rod Adjustment from Gibson
Guitar Setup Best Practices from Music Industry Association
Frequently Asked Questions
How do I know if my truss rod needs adjusting?
Check for a bowed neck or excessive fret buzz. Place a straightedge along the fretboard under string tension. If there's a visible gap (more than a business card thickness) between the straightedge and the frets, your neck has too much relief. If the straightedge sits flat or shows a backbow, your truss rod needs adjustment. Excessive action at the nut or bridge may also indicate the need for a truss rod adjustment to achieve proper neck relief.
What's the safest amount to turn a truss rod at one time?
The quarter-turn rule is the industry standard: never turn more than 1/4 turn (90 degrees) at a time. This conservative approach prevents over-tightening, which can crack the headstock or strip the adjustment nut. After each quarter-turn, allow 24-48 hours for the neck to settle before re-measuring and making additional adjustments. This patience protects your guitar and ensures accurate results.
How does climate and humidity affect truss rod adjustments?
Wood expands and contracts with humidity changes, affecting neck relief and string tension. In dry climates, necks tend to develop backbow; in humid conditions, they may bow forward. Make adjustments during stable humidity levels, and avoid adjusting immediately after weather changes. Allow extra settling time during seasonal transitions. If your guitar experiences extreme humidity swings, you may need periodic re-adjustments to maintain optimal action and neck relief.
Can adjusting a truss rod ruin my guitar?
Improper truss rod adjustment can damage your guitar, but following safety precautions minimizes risk. Over-tightening can crack the headstock or strip the adjustment nut. Under-tightening won't cause damage but won't solve playability issues. The key is using the quarter-turn rule, measuring carefully with a straightedge and feeler gauge, and allowing settling time between adjustments. If you're unsure, consult a professional luthier, Guitar Dx-2-Rx offers expert setup services with a guaranteed 5-7 day turnaround.
This article was written using GrandRanker